We will learn how to create README files for GitHub using Markdown. You can download a template by clicking here, you should save the file with the name “README.md”. The contents of this post were adapted from Best-README-Template.
Visual Studio Code and Markdown
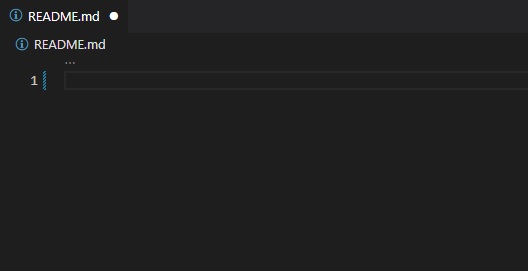
Visual Studio Code natively supports the Markdown formatting language, we will create the file using this environment. Open Visual Studio Code and a project’s folder. Then click on create new file and create a file named “README.md”. You should get something like the following figure.
Now you can write the contents of your Readme file in this environment. If you would like to see how the file looks like you can use the Markdown previewer by pressing Ctrl+Shift+V.
Sections of the Readme file
Although you may create a Readme file with whatever contents you want, it is important to use the Readme file to communicate your audience how to use and what to use for the code stored in your repository. Try to include enough sections to answer the following questions:
- How to install the program?
- What is the program for?
- Who should use the program?
- What updates are planned?
The README.md template that I have provided uses the following sections:
- Contents. A table listing the contents of the README file.
- Built with. A listing of each of the programming languages that were used in the code.
- About. A presentation of your project. Explain what it is about.
- Usage. How to use and install the software.
- To-Do. A listing of planed updates and things left to do.
- Contact. The contact information of the author.
- License. General information regarding the License.
In order to make a section in Markdown we have to write the pound sign (#) before the title. This is the format:
# Title
You can create subsection titles under another heading by using more pound signs before (#) the section title.
## Subsection Title
An example of how these titles may look rendered in GitHub is shown in the next figure.

Creating lists in a Readme file using Markdown
An easy way to organize the information of a Readme file is through the use of lists. There are several lists that can be created in the Markdown formatting language. Lists in the Markdown language include numbered lists, bullet lists, and checklists.
Numbered lists
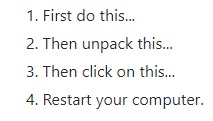
The easiest kind of list to create in Markdown is a numbered list. In order to create a numbered list all you need to do is number each of the items with the corresponding number followed by a dot and then a space.
1. First item

2. Second item
In GitHub this may be rendered like in the next figure.
Bullet lists
Another kind of list may be created by using hyphens, this is the bullet list. As with a numbered list the bullet list is rendered with indentation from the other paragraphs. In order to create a bullet list you would use a hyphen and then a space followed by the item. As with the numbered lists each item must be located in the next line.
- First item
This list is rendered with bullets in GitHub.

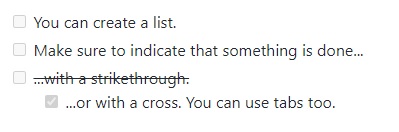
Checklists
A third kind of list that you can create with Markdown is a checklist. Which you can even fill with a checkmark. Checklists are created with square brackets and a hyphen. The format is hyphen, space, open bracket, space, close bracket and then space. You can replace the last bracket with the character x in order to create a filled checkbox.
-[ ] Unmarked item

-[x] Marked item
This may be rendered in the GitHub like the following figure.
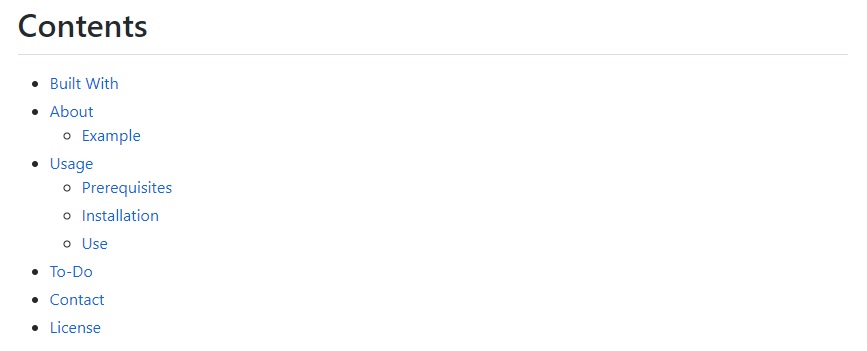
Creating a table of contents for a Readme file
GitHub can automatically identify the sections of your README.md file from the formatting of your Markdown, but you may want to create a table of contents that is easily accessible at the top of your file to help with navigation. Once your Readme file is uploaded to GitHub the table of contents will look like this.
In order to do that you can use the hyperlink formatting. To create a hyperlink in Mardown we use the following format.
[Text of the link](https://your-link-goes-here)
Interestingly we can use this format to link to an anchor. Each of the section headers start with an anchor indicator, the pound sign (#). Therefore we can use the following format to create a table of contents that links to each of the sections.
- [About](#about)

- [Example](#example)
It is very important that you notice that the format starts with a hyphen and then space and that square brackets are used. You can add a space before a hyphen to make that title appear below another header, thus creating subsections.
Making tables with Markdown
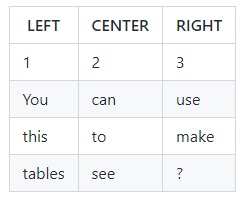
In this last section, I will show you how to make a table with the Markdown format. Tables in Markdown are created with hyphens and bars (|). Bars are used to denote vertical lines in the table and hyphens are used below the table headers. If you don’t include the hyphens the table wont be displayed. This is an example format.
| LEFT | CENTER | RIGHT |

| ------ | ------ | ----- |

| 1 | 2 | 3 |
This table will be rendered in GitHub as shown in the following image.